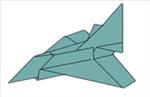
Origami is 'the art of paper folding' which had its origins in Japan. Now it is one of the most popular of all paper crafts in the world. The word 'Ori' in Japanese means to fold and 'Kami' means paper. The earlier Origami designs were created in Japan for symbolic or ceremonial purposes and not for recreation. Much later it evolved into a creative pass time especially in the 50's, when it spread and gained popularity in the West too and is now enjoyed by many the world over.
The art is very impressive and requires no equipment or facilities other than a sheet of paper and a hard surface to work on. Paper folding uses techniques ranging from simple to complex designs. The transformation of an ordinary piece of paper into a pleasing origami design is a kind of alchemy. It is, at once, a challenge to the eye, brain and the fingers - a wonderful mental and physical exercise.
Papers like the less expensive Xerox paper to computer paper, typing paper, writing paper, gift-wrap paper and even brown wrapping paper can be used for Origami.
 The entire world of paper folding revolves around some basic folds. A basic fold is a fold from which many models can be developed. No sequence of origami diagrams can be followed without an understanding of the symbols/ folds they use. Most of the symbols are obvious from the diagrams but it would be very helpful to know the two basic and standard folds- Mountain (Diagram on the right) and Valley (Diagram on the left). The entire world of paper folding revolves around some basic folds. A basic fold is a fold from which many models can be developed. No sequence of origami diagrams can be followed without an understanding of the symbols/ folds they use. Most of the symbols are obvious from the diagrams but it would be very helpful to know the two basic and standard folds- Mountain (Diagram on the right) and Valley (Diagram on the left).
 The mountain fold and the valley folds are always indicated by the particular symbols shown in the figures and the mountain fold is always folded back while the valley fold is folded in front. The mountain fold and the valley folds are always indicated by the particular symbols shown in the figures and the mountain fold is always folded back while the valley fold is folded in front.
Make sure that the paper you are folding is exactly square. Before folding the paper, study each diagram showing the complete folded model and read the instructions carefully and only then make your first fold. Always fold carefully, accurately and neatly. If folded hurriedly and carelessly, the result will be disappointing. When you make a fold, always crease the paper firmly with the back of your thumb-nail. Good creases make folding easy and are a valuable guide later in the model, when you are making a series of folds. Before making a reverse fold, pre-crease the paper by folding the whole thickness before opening the paper and making a fold. |